Pages

Tuesday 30 July 2013

Tamarillo Meringue Roulade : Flavor that Travelled from Jibama Market


Tamarillo Meringue Roulade 
 
I was happy and thrilled when I tasted this Tamarillo Meringue Roulade, even though I was not that enthusiastic when I read the KBB challenge on my email early June. Let me be honest... I didn't like meringue. As simple as that. My experience with meringue tasting was not that satisfactory. Not much of a flavor except the sweetness. But how wrong I was be! The fact is.. I had never baked my own meringue! and that was why I didn't like all the meringue I ever ate. When we buy meringue desserts, we have no control of whatever being added in. They usually made according to the general preference. Nowadays, I see that people eat more and more sugar, and like everything sweeter and sweeter. So, after received the KBB challenge, I started digging up references, and realized that most of the recipe incorporates sour/tart fruits to balance the sweetness. Good point. But of course, I didn't stop on that. I studied the white-eggs and sugar ratio as well. What I finally did was reducing the sugar from the KBB's recipe by 20 grams from 150 grams to 130 grams. By chance, I have some tamarillos I bought from Jibama traditional market in Wamena, Papua highland. I was on my working trip to that area, Baliem Valley, where the locals plant tamarillo trees and sell the fruits at the local markets all year round. Actually, I can easily get tamarillo from the fruit stores or supermarkets in Jakarta, but the one sold in Wamena has much more flavor because they are picked only when it's already red and ripen, and the tamarillo trees are planted without using any chemicals... so they are organic fruits. In my baking, flavor is the most important factor. With good combination of flavor, the food will stand out.

This time, I received two recipes for the challenge: Classic Berry Pavlova and Passion-fruit Meringue Roulade. Comparing the two recipes, I thing the roulade is not as sweet as the pavlova, so I decided to bake the roulade. But I still reduced the amount of sugar and using tamarillo (which already sit in my fridge for several days). Here in Jakarta, it would be big problem to find the sour passion-fruit on the market. What we have in Jakarta is the sweet passion-fruit.. the new variety that has no tart or sour taste at all.. which I don't really like as much as the sour one.

Now, here is the recipe...

Tamrillo Meringue Roulade
Adapted from ABC Delicious: Sweets - Passionfruit Meringue Roulade

For the meringue:
3 egg whites
130 gram caster sugar
½ tsp white wine vinegar
1 tsp cornstarch

For the filling:
200 ml heavy cream
1 tsp caster sugar
10 tamarillos (cut in half, using small spoon scoop-out the flesh, and slice 2-3 mm thick)

For decorations and assembling:
Put aside 2-4 slices of tamarillo
1 tsp powdered sugar for dusting


Preheat the oven to 190 oC. 
Prepare a 34 cm x 24 cm swiss roll baking tray. Thinly coat with butter or cooking oil, and line with parchment paper.

Using a mixer with medium speed, whisk egg whites to soft peak consistency, then add the sugar in several additions. Increase the speed and continue whisking until hard peak consistency.

Sieve the cornstarch on to the beaten egg whites and add the vinegar in. Reduce the speed to low and whisk just to combine.

Pour into the prepared baking tray and smooth the surface using spatula or spoon.
Bake for 10-12 minutes until the surface is light brown. Set aside.

Meanwhile, prepare the filling. Whip the heavy cream and sugar to soft peak.

To assembly:
Carefully flip the cooked meringue on a sheet of parchment paper that has been sprinkled with caster sugar. Peel off the parchment lining that was at the bottom of the baking tray.

Spread the whipped cream on top of the meringue and top with tamarillo slices.

Using the parchment paper, roll the meringue as you roll a swiss-roll. Tuck the end at the bottom. Keep in the fridge for 2 hours to set. 

Before serving, top with tamarillo slices, dust with powdered sugar, slice and serve cool.


Wednesday 27 March 2013

Artisan Bagels : Sesame, Black Pepper and Parmesan Cheese

Sesame Bagels and Parmesan Black Pepper Bagels 3


Sesame Bagels and Parmesan Black Pepper Bagels 1
Sesame Bagels and Sesame Parmesan Black Pepper Bagels
The KBB challenge this time is Bagels. And not simply bagels.. it's an artisan bagels.. the one with long fermentation. See the recipe in Indonesian languange here. I love baking and eating breads especially the one with long fermentation, with crisp slightly chewy crust and moist crumb inside. I love those traditional breads.. the one people also called artisan breads. One type of bread I wanted to bake since long is the one using sourdough starter. But maybe this for the next... I don't know, I have to gather a lot of courage to try making my first sourdough starter.

Sesame Bagels and Parmesan Black Pepper Bagels 4
Yummy Sesame Parmesan Black Pepper Bagels
 Now, back to bagels. There are several notes I'd like to share with you. I make two batches of bagels. I could not find barley malt syrup, so I substitute it with forest honey. I also could not find unbleached bread flour and simply used common (bleached) bread flour.

Sesame Bagels and Parmesan Black Pepper Bagels 5
Nice moist flavorful crumb and slightly chewy crust
I made two batches of Bagels this time. The first one with a long fermentation inside the fridge after being donut-shaped, without using honey in the poaching liquid (well.., I actually forgot to put it in), and poaching time of 2 minutes in total for each bagel as mentioned in the recipe.

For the second batch, I put the bagels in the fridge for the same long fermentation right after kneading and before being shaped, then shape the bagels after, let it rise for another 60 minutes before poaching them. For the second poaching liquid, I add honey according to the recipe and cut back the poaching time half to 60 seconds in total for each bagel.

I think I prefer shaping the bagels after being slowly raised in the fridge, instead of shaping them before being put inside the fridge for the fermentation. Like this, the shape would be better, and there is less chance to over-proof the dough.

I noticed that the longer poaching time is, the chewer the bagel is, and using honey on the poaching liquid makes the bagel color darker.

Sesame Bagels and Parmesan Black Pepper Bagels 2
First batch bagels

Sesame Bagels and Parmesan Black Pepper Bagels 3
Second batch bagels

Wednesday 30 January 2013

Swiss Roll: A Story of A First

Swiss Roll with Raspberry Honey Cream Filling
This has been neglected for too long. Last post was March 2012, almost one year. At the end of 2012, an email came asking if I am still interested to join the Indonesia version of Dare Baking Club: Klub Berani Baking (KBB). Of course I answer yes. First, I will have new challenges every 2 months, then definitely a chance to learn more baking and to explore myself. A good opportunity for me, no?

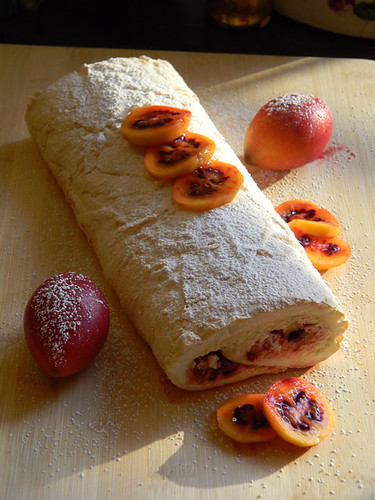
So here I am now, blogging about my first post this year, my first challenge in the club, and my first swiss roll.

Honestly, I was freaked out reading the challenge... Oh no, JRC or Japanese Roll Cake? Junko's Japanese style Swiss Roll?  with cute drawing on the roll? I've never baked swiss roll or roll cake before. I read that people often have issues on rolling the cake and it cracks. While thinking the best way to meet the challenge, I read the members' posts in the KBB maillist, many have problems already... It seems that this JRC or Japanese Roll Cake is more difficult than the ordinary roll cake. My confidence was sliding down the floor and melt like a marshmallow on a campfire. What can I do? When Junko post it in her blog (in japanese only), this kind of swiss roll (she named it Deco Roll) instantly hit the top. Oh no, don't look at my "towel" cake photo, that's the ugly failed one, far from kawaii or cute.. look at all the deco roll posted on her blog (at least you can look at the pictures, no?), then you will understand why people immediately fall in love to this kind of swiss roll. They are amazing! And me, after visiting Junko's blog, I think I caught the bug...

You might wonder.. towels? No, those are from my second attempts baking swiss roll

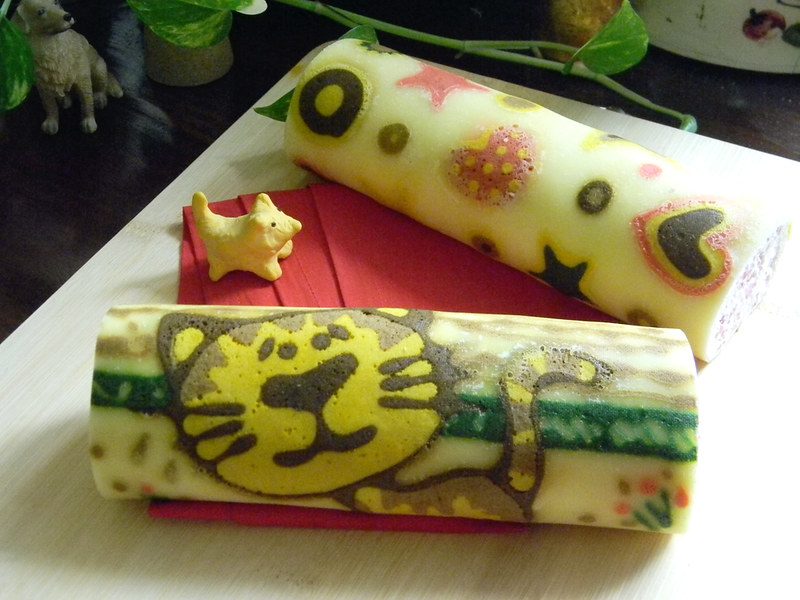
The challenge was sent with a recipe from Ibu Rachmah Setyawati, with detail instruction on how to draw design with cake batter. She posted her Sweet Green Polka Dots Japanese Roll Cake on her blog in October last year. Using recipe from Junko's book and modified it a little. That was the one sent to us for our challenge. In total I tried 3 times, the first and second attempts were disaster... you can see what I came up with from the "towel" picture above. Not only that they didn't raise well, they were wrinkle like the skin of that "towel dog" Chinese Shar Pei... This challenge really made me think hard how to solve those problems. The cake is supposed to be airy soft and smooth. I realised that I didn't fold the batter properly during mixing and I lost too much air from the batter. Let me explain how to make drawing design on this kind of swiss roll. Before pouring the main batter, we have to make design  or drawing using colored batter on a parchment paper that used to line the bottom of the baking tray. Freeze or quick-bake to set, cover with main batter and bake as usual. While doing the batter-drawing, I noticed that the moisture from the batter seeps into the parchment paper and makes it wrinkle. So, the solution I can think of are folding and mixing the batter carefully not to lose air, and using water resistant liner to line the baking tray or using silicone baking tray. Well, I don't have silicone baking tray, but I have this reusable silicone/parchment baking paper like this Kitchen Supply Parchment Paper (not paper actually), that can be cut to fit the tray. I wonder also if we can use wax paper or lightly oil the parchment paper? Maybe for the next experiment.

Taking care not to over-mix, the result from the third try was good. It seems that whisking egg white to the right consistency (soft peak) 
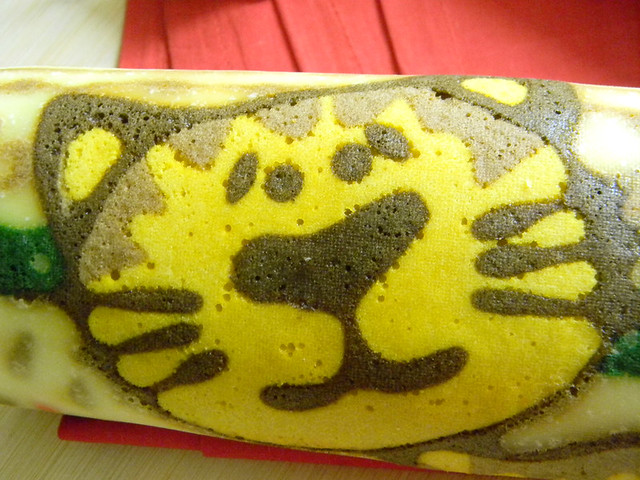
and mixing/folding the batter play a very very crucial role here. I enjoyed drawing the designs with different color.

Swiss Roll with Raspberry Honey Cream Filling

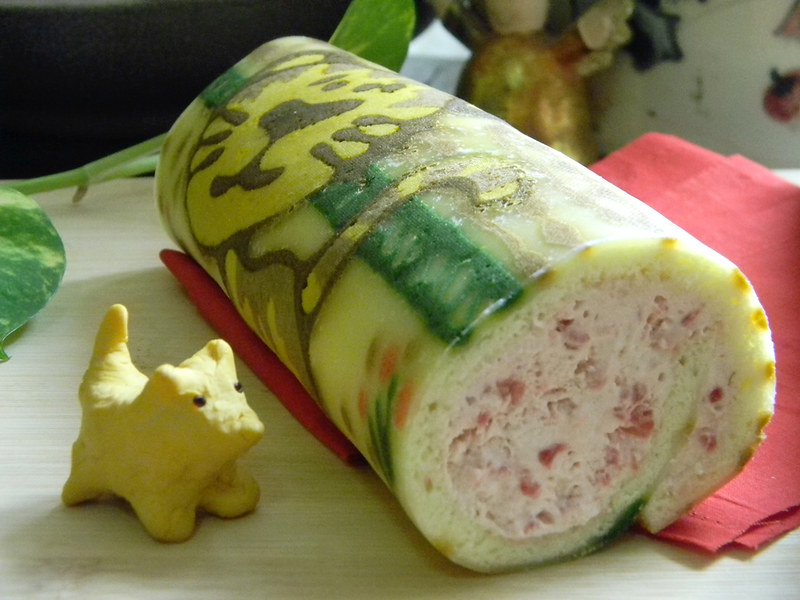
The cake recipe is based on sponge-cake recipe, using mostly white eggs. That's why it's a little bit "springy" when you bite on it, but I see that it minimize the risk of cracking when we roll and shape the cake. It's nicely soft, and with a good flavor for the creamy filling you'll have the best roll cake, in appearance, texture, and flavor. A complete package.

For the filling, on the second attempt (the "towel" swiss roll) I simply whip heavy cream and mix in the frozen mango puree (Gedong Gincu mango) I have in my freezer, no sugar added since the mango puree is already sweet enough from the mango. For the good third swiss roll, I use frozen raspberry and since the frozen raspberry is not sweet enough, I added honey to sweeten. Appears to be a good flavor combination.. raspberry and honey.

The recipe from KBB is good, but I see that the batter for drawing is way too much (well, at least for my design), so I reduced and separated just enough volume using Junko's technique.

Swiss Roll with Raspberry Honey Cream Filling