Pages

Tuesday 31 May 2016

Caramel Cake... or Pudding?


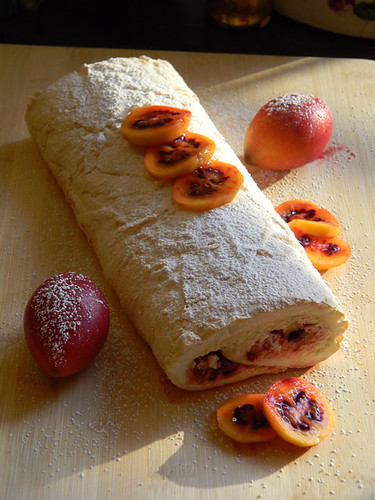
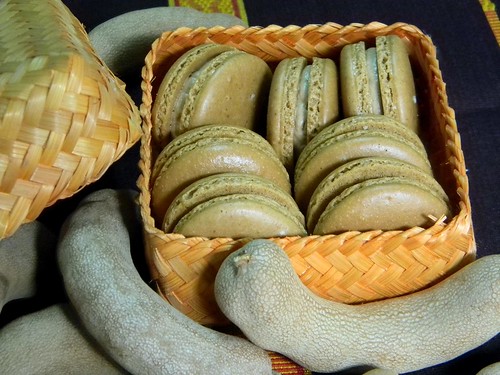
Another old time favorit... Caramel Cake or Kue Sarang Semut in Indonesian language, literaly means "Ant Nest Cake".


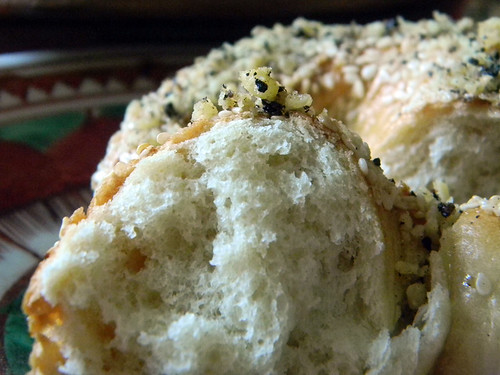
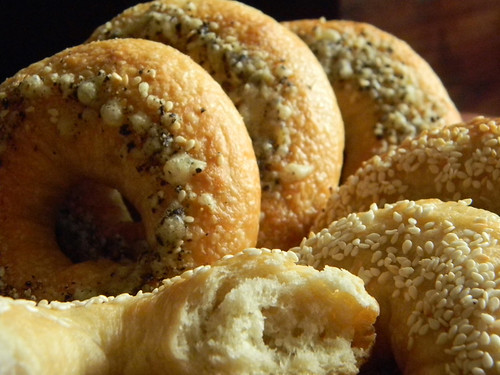
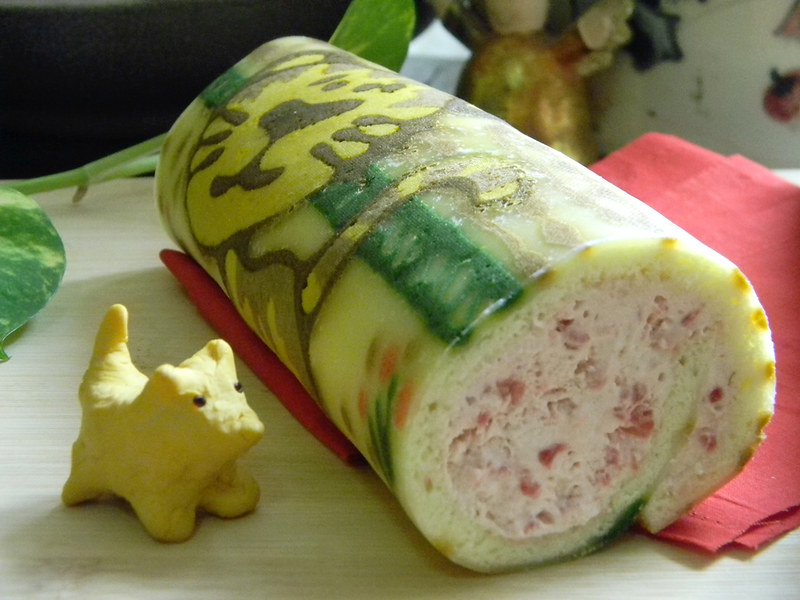
Do you see the holes and tunnels all over the cake? That's how it gets its name from.

For this challenge, I deliberately make a very dark caramel. Of course, being careful not burning my caramel too much. By doing so, I can have a strong caramel flavor and since the darker the caramel, the less sweet it is, I add about 200 grams of condensed milk to balance it out. The end result is perfect.. suit my not-so-like-too-sweet taste buds.

Other lesson I learned from this challenge was not to whisk the eggs too much. In fact, I should have avoid creating bubbles as much as possible.


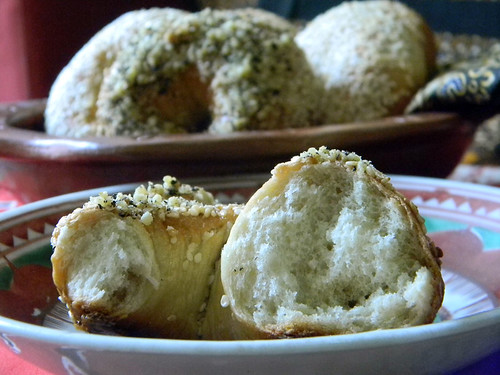
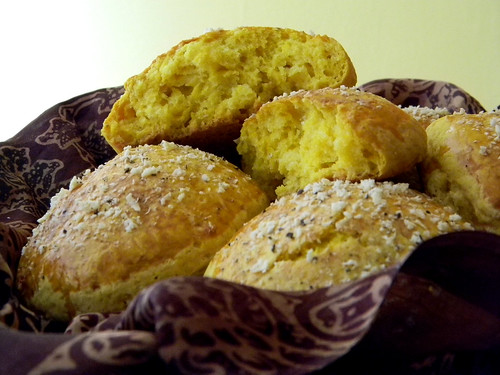
On the picture above, the lighter color and spongy texture on the cake... that's the result of my unnecessary vigorous whisking. We should look for the darker smooth gelatinous consistency with "ants' tunnels" texture in it. The smooth gelatinous darker part (all the cake should be like this) was so smooth, almost like pudding. Oh my... it's way better than the caramel cake I used to buy.

Unlike making other cake, this caramel cake is so easy to make. Use only common and easy to get utensils and an oven, everybody can make this cake. A bowl, a whisk, a rubber spatula (or spoon), a pot or deep pan for making caramel, a small pot for boiling water, a ring cake pan, and an oven. That's right... no mixer!  The technique also simple... simply mix everything together. The sequence is not that important here. The more difficult part is only making the caramel. However, with the low heat and patience, you can nail the caramel. So, why wait? Let's make the cake!


CARAMEL CAKE
Recipe by Iis Zainal Abidin


Ingredient:

For caramel:

1.5 cups + 2 tbsp sugar
600ml boiling water

For cake:

8 eggs
2 tbsp butter, melted
175g sweetened condensed milk (if you prefer very dark caramel, you can add more up to 200g)
1.5 cups + 2 tbsp all-purpose flour
2  tsp baking soda + 1 tsp baking powder (sieve together with the flour)

How to bake:

The caramel:

To make the caramel, put all the sugar in a deep pan, on a low heat. Do not stir until most of the sugar is caramelised.

Then pour in the boiling water. Be carefull, since it will bubble up a little bit. That is why it is better to use a deep pan for a safety reason.

Stir until all the caramel is disolved. Set aside to cool.

The cake:

Prepare a ring cake pan with butter and dusted with flour.  Preheat your oven to 180 °C

Whisk the eggs until the whites and the yolks mixed well and smooth. Taking care not to create too much bubbles. This step will determine the pudding-like consistency of the cake.

Mix together condensed milk and melted butter, and add it to the eggs. Mix well.

Add the cold caramel liquid you make earlier, stir. Next, add in the flour, and mix well using whisk.

Pour into your prepared cake pan, and bake for 45-50 minutes.


Let it cool before taking it out from the pan, cutting and serving.

The left over can be kept in an air-tight container in the fridge for 5 days.


Note: if you like, you can reduce the sweetened condensed milk, and serve the cake with cream or your favorit sweet sauce


Thursday 1 October 2015

Soesmaker : the Wonderful Past


Yup! it's quite a long time absent from blogging... and from the lovely KBB (Klub Berani Baking - an Indonesian version on dare baking club).
This time is to celebrate the 8th KBB birthday. As for me, this is my second year with KBB, and eventhough I didn't do every challange, I learned a lot from KBB.


This time, the challenge was to make a kind of cupcake called Soesmaker. I remember the first time I ate soesmaker... well, I don't even remember precisely how many years ago.. maybe 30 years ago.. the first bite seemed strange, but then I loved the combination of the softness with a little bit of sweetness and savory taste.


At that time, soesmaker was quite trendy. In fact, it's a combination of sponge cake and savory filling...
See... it's strange, isn't it? Dare to try? Here is the recipe...


Soesmaker
Adapted from Sajian Sedap
For 25 small cakes

Prepare muffin pan(s), lined with muffins paper cups.

For the savory filling :
1 Garlic, finely chopped
2 Tbsp all purpose flour
150 ml beef stock
50 grams minced beef
5 pcs of string beans
30 grams carrot, cut in very small cubes of 3-5mm, boiled
1/4 tsp salt
1/8 tsp pepper
1/4 tsp nutmeg powder
1/4 tsp sugar
1 Tbsp parsley, chopped
1 Tbsp green onion, sliced

1 Tbsp butter 

For the Cake :
5 egg-yolks
3 egg-whites
25 grams sugar
1 tsp emulsifier (sp/tbm) *optional
75 grams all purpose flou, sieved
50 grams butter, melted


Make the filling :
Heat the butter and sautee the garlic.
Add-in the flour, mix, and pour in the beef stock a little bit at a time. Stir until well-combined and smooth.
Add the minced-beef, carrot, and string bean. Season with salt, pepper, nutmeg, and sugar. Continue cooking over low heat until thicken.
Add the parsley and green onion. Mix well and set aside to cool.

At this time, preheat the oven to 190 ºC.

Make the Cake:
Whisk all together the eggs (yolks and whites), sugar, and emulsifier until soft peak.
Add the flour in 2 additions by sieving it into the egg batter. Mix carefully using a rubber spatula.
Add the melted butter, and mix well.

To assembly :
Fill half of the muffin cups with cake batter.
Using a teaspoon, fill the cups with about 1/2 tsp of the filling.
Top with the cake batter until almost full.

Bake 20 minutes in a pre-heated oven (190 ºC) until cooked.
Served with hot tea or coffee. Delicious!


And now, this is my reward from KBB! I passed the challenge and got the logo! Yay!!!


Monday 31 March 2014

Lapis Legit : The Indonesian Thousand Layer Spice Cake


This is my first time making Lapis Legit... the Indonesian layer cake, made with egg (mostly eggyolk), butter, sugar and a little bit of flour. Thanks to the Indonesian dare baking club or Klub Berani Baking (KBB) who has Lapis Legit challenge this time, I now know how easy it is to make Lapis Legit, even though it needs a huge portion of patience and takes hours to make. I made this for almost 6 hours, mostly sitting in the kitchen layering the cake a spoonfull by a spoonfull until all the batter are used up. The whole house was smell sweet-cinnamonly nice. The result is so rewarding. The cake is delicious!


The challenge from Klub Berani Baking was to make Lapis Legit Prune. Since I am not fan of sweet dried fruit (well, love the sour ones thou...), so I simply omit the prune from the recipe and added Lapis Legit powder instead. I also replace the margarine on the recipe with butter. The original recipe the KBB sent to me has 200 grams butter and 200 grams margarine. I baked my Lapis Legit using 400 grams butter instead. All butter and no transfat!!

There are several things I learned from the process, which is that the batter is in fact an emulsion... mostly contains fat from the butter and eggyolk. The butter should be a little bit cold, and cut in cubes. When whisking, either the egg yolks or the butter, make sure that the egg yolk or the butter turn really pale, which means we manage to incorporate a lot of air in it. This is an important step to have a very soft consistency that will make the mixing way much easier.


 As the batter contains a lot of fat from the butter, it is important to keep the batter away from any heat. As a guidance, the room temperature to keep is where butter is not melted but not becomes solid too... so, about 20-25 ºC would be perfect (the refrigerator would be too cold, and you don't want to open your fridge's door too often). If the temperature is too hot, the batter will melt and separate. Remember that the process of making layers could take several hours. Usually, when the oven in the kitchen is on, the kitchen temperature would be hotter, risking to melt the batter. So what I did was, I put the bowl of the batter in an air-conditioned room (my dining/living room) and just took about 1/2 - 1 Cup at a time, enough for 2 - 4 layers. The rest stayed in a cooler room. Well, for you who live in a cool climate country, you don't need to do this precaution, but for us living in a hot tropical place... I think that was the best we can do.


I think I have to make another one. The layers on my cake were not even in color. Some are a bit darker and some are lighter. Even on the same layers! I see that it's because I put the baking pan too close to the top heat. I should have lowered the rack make it a bit further away from the heat. Like that it will have more even color on each layer. As we know, each oven is different, so we have to make experiment to find the perfect condition.


So, this is my recipe, after I adjusted the recipe that I got from the Klub Berani Baking...

Lapis Legit

400 gram butter, cold from the fridge, cut in small cubes
2 tbsp condensed milk
27 eggyolks
2 white eggs
200 gram caster sugar
1 tsp vanilla extract
20 gram cake emulsifier (TBM)
60 gram cake flour
25 gram of cornstarch
2 tbsp Lapis Legit powder

Line the bottom of a 18 cm x 18 cm x 5 cm baking pan with parchment paper. Put aside.
Sieve together the flour, cornstarch and Lapis Legit powder. Set aside.

Preheat the oven to 180 ºC.

In a big bowl, on a stand electric mixer, whisk the eggyolks, white eggs, caster sugar, emulsifier and vanilla extract until it's pale in color and double in volume (about 20 minutes).

In a smaller bowl, whisk the butter and the condensed milk, until it's light and pale in color (about 12-15 minutes).

While the mixer running, add the whisked butter mix to the egg sugar mix, two table spoonfull at a time. We are going to make emulsion here, so be patient adding the butter. One spoonfull at a time... until all the butter has been well mixed in. The batter will deflat a little bit, but that's OK.

Stop the electric mixer, and using a spatulla, add the flour mix into the batter. Fold it in to mix well.

Use 1/4-cup measuring cup to measure the batter for the layers.

Start the first layer a little bit more than 1/4 cup. Smooth the surface with a spoon or spatula. Bake for 5 minutes or until the surface is brown, and take the pan out from the oven. Add another 1/4 cup of batter on top of the first layer. Put it back in the oven for another 5 minutes or until the surface is brown. Then take it out from the oven to add another layer.

After the third layer, switch to the top heat. Adjust the flame smaller so not to burn the cake. We only need it to brown the layers' surface. It's about 3 minutes for each layer. Be carefull not to burn a layer.
In the mean time, keep the rest of the batter from heat.

Do the same layering process with the top heat until all the batter is used up. Every time when you see the surface is "bubbled", flatten it by pressing it down with a spoon.

After all the batter is used up, switch again to the bottom heat, set to 180 ºC. Bake for another 15 minutes.

Let it cool before removing the cake from the pan.
Slice a thin layer on each side to make it neat and reveal the layers.

Cut one piece for yourself and enjoy.


Friday 31 January 2014

Classic Baguette : An Addictive Bread


A New Year, and the Indonesian dare baking club (Klub Berani Baking) challenge this time was to bake French style baguette.
I love baking bread, and baguette is one of my favorite bread. I baked my baguette twice for this challenge. First, I precisely followed the recipe given, and with some adjustment here and there for the second one.

OK. To make thing short, here is the recipe given by the hostess of the KBB challenge. It was not mentioned where she got it from. Oh...! sorry if you don't understand the language.. it's in Indonesian language. But don't worry, I will tell you what has been changed from the original recipe.


First bake
I followed the recipe as it is, and apparently, the dough rose very quick. Well, I always like the slow risen bread since it has more time to develop the nicer flavor. But, this time it was super quick... yeah, not even 30 minutes on the final proof (after being shaped and before going to the oven), it was already more than doubled. It was difficult to slice for two reasons. One because it was expand too much, and then because I don't have a proper slicer for this purpose. I tried using my sharpest knife. But it didn't work well. The knife was too thick and the dough was overproven, so it was collapsed a little bit. Well, the cooked bread was nice... with moist crumb and crunchy crust. However, since it was risen too quick, the flavor was a bit blunt. So I made a few adjustment for my second bake.

Second bake
Adjustment 1: I took care for the starter not only for 2 days as the recipe calls, but for 5 days. This is so the starter would develop more flavor. Adding water and flour every day to feed the starter.
Adjustment 2: I also amited adding more yeast for the dough, using only yeast from the starter. It definitely worked to slow down the proofing process.

With this two adjustment on the recipe, the baked bread has more rustic nutty flavor... just like artisanal bread from boulangerie in France... yum!


On the second bake, I tried using the blade from a paper cutter. Of course I used a new one and washed it clean first. It worked!
Ah ya, in France, they use couche in proofing the bread dough. I don't have one. So I used silicon paper (you can use parchment paper too), folded in between the bread to separate them.. then simply flatten it down before baking.


Tuesday 30 July 2013

Tamarillo Meringue Roulade : Flavor that Travelled from Jibama Market


Tamarillo Meringue Roulade 
 
I was happy and thrilled when I tasted this Tamarillo Meringue Roulade, even though I was not that enthusiastic when I read the KBB challenge on my email early June. Let me be honest... I didn't like meringue. As simple as that. My experience with meringue tasting was not that satisfactory. Not much of a flavor except the sweetness. But how wrong I was be! The fact is.. I had never baked my own meringue! and that was why I didn't like all the meringue I ever ate. When we buy meringue desserts, we have no control of whatever being added in. They usually made according to the general preference. Nowadays, I see that people eat more and more sugar, and like everything sweeter and sweeter. So, after received the KBB challenge, I started digging up references, and realized that most of the recipe incorporates sour/tart fruits to balance the sweetness. Good point. But of course, I didn't stop on that. I studied the white-eggs and sugar ratio as well. What I finally did was reducing the sugar from the KBB's recipe by 20 grams from 150 grams to 130 grams. By chance, I have some tamarillos I bought from Jibama traditional market in Wamena, Papua highland. I was on my working trip to that area, Baliem Valley, where the locals plant tamarillo trees and sell the fruits at the local markets all year round. Actually, I can easily get tamarillo from the fruit stores or supermarkets in Jakarta, but the one sold in Wamena has much more flavor because they are picked only when it's already red and ripen, and the tamarillo trees are planted without using any chemicals... so they are organic fruits. In my baking, flavor is the most important factor. With good combination of flavor, the food will stand out.

This time, I received two recipes for the challenge: Classic Berry Pavlova and Passion-fruit Meringue Roulade. Comparing the two recipes, I thing the roulade is not as sweet as the pavlova, so I decided to bake the roulade. But I still reduced the amount of sugar and using tamarillo (which already sit in my fridge for several days). Here in Jakarta, it would be big problem to find the sour passion-fruit on the market. What we have in Jakarta is the sweet passion-fruit.. the new variety that has no tart or sour taste at all.. which I don't really like as much as the sour one.

Now, here is the recipe...

Tamrillo Meringue Roulade
Adapted from ABC Delicious: Sweets - Passionfruit Meringue Roulade

For the meringue:
3 egg whites
130 gram caster sugar
½ tsp white wine vinegar
1 tsp cornstarch

For the filling:
200 ml heavy cream
1 tsp caster sugar
10 tamarillos (cut in half, using small spoon scoop-out the flesh, and slice 2-3 mm thick)

For decorations and assembling:
Put aside 2-4 slices of tamarillo
1 tsp powdered sugar for dusting


Preheat the oven to 190 oC. 
Prepare a 34 cm x 24 cm swiss roll baking tray. Thinly coat with butter or cooking oil, and line with parchment paper.

Using a mixer with medium speed, whisk egg whites to soft peak consistency, then add the sugar in several additions. Increase the speed and continue whisking until hard peak consistency.

Sieve the cornstarch on to the beaten egg whites and add the vinegar in. Reduce the speed to low and whisk just to combine.

Pour into the prepared baking tray and smooth the surface using spatula or spoon.
Bake for 10-12 minutes until the surface is light brown. Set aside.

Meanwhile, prepare the filling. Whip the heavy cream and sugar to soft peak.

To assembly:
Carefully flip the cooked meringue on a sheet of parchment paper that has been sprinkled with caster sugar. Peel off the parchment lining that was at the bottom of the baking tray.

Spread the whipped cream on top of the meringue and top with tamarillo slices.

Using the parchment paper, roll the meringue as you roll a swiss-roll. Tuck the end at the bottom. Keep in the fridge for 2 hours to set. 

Before serving, top with tamarillo slices, dust with powdered sugar, slice and serve cool.


Wednesday 27 March 2013

Artisan Bagels : Sesame, Black Pepper and Parmesan Cheese

Sesame Bagels and Parmesan Black Pepper Bagels 3


Sesame Bagels and Parmesan Black Pepper Bagels 1
Sesame Bagels and Sesame Parmesan Black Pepper Bagels
The KBB challenge this time is Bagels. And not simply bagels.. it's an artisan bagels.. the one with long fermentation. See the recipe in Indonesian languange here. I love baking and eating breads especially the one with long fermentation, with crisp slightly chewy crust and moist crumb inside. I love those traditional breads.. the one people also called artisan breads. One type of bread I wanted to bake since long is the one using sourdough starter. But maybe this for the next... I don't know, I have to gather a lot of courage to try making my first sourdough starter.

Sesame Bagels and Parmesan Black Pepper Bagels 4
Yummy Sesame Parmesan Black Pepper Bagels
 Now, back to bagels. There are several notes I'd like to share with you. I make two batches of bagels. I could not find barley malt syrup, so I substitute it with forest honey. I also could not find unbleached bread flour and simply used common (bleached) bread flour.

Sesame Bagels and Parmesan Black Pepper Bagels 5
Nice moist flavorful crumb and slightly chewy crust
I made two batches of Bagels this time. The first one with a long fermentation inside the fridge after being donut-shaped, without using honey in the poaching liquid (well.., I actually forgot to put it in), and poaching time of 2 minutes in total for each bagel as mentioned in the recipe.

For the second batch, I put the bagels in the fridge for the same long fermentation right after kneading and before being shaped, then shape the bagels after, let it rise for another 60 minutes before poaching them. For the second poaching liquid, I add honey according to the recipe and cut back the poaching time half to 60 seconds in total for each bagel.

I think I prefer shaping the bagels after being slowly raised in the fridge, instead of shaping them before being put inside the fridge for the fermentation. Like this, the shape would be better, and there is less chance to over-proof the dough.

I noticed that the longer poaching time is, the chewer the bagel is, and using honey on the poaching liquid makes the bagel color darker.

Sesame Bagels and Parmesan Black Pepper Bagels 2
First batch bagels

Sesame Bagels and Parmesan Black Pepper Bagels 3
Second batch bagels

Wednesday 30 January 2013

Swiss Roll: A Story of A First

Swiss Roll with Raspberry Honey Cream Filling
This has been neglected for too long. Last post was March 2012, almost one year. At the end of 2012, an email came asking if I am still interested to join the Indonesia version of Dare Baking Club: Klub Berani Baking (KBB). Of course I answer yes. First, I will have new challenges every 2 months, then definitely a chance to learn more baking and to explore myself. A good opportunity for me, no?

So here I am now, blogging about my first post this year, my first challenge in the club, and my first swiss roll.

Honestly, I was freaked out reading the challenge... Oh no, JRC or Japanese Roll Cake? Junko's Japanese style Swiss Roll?  with cute drawing on the roll? I've never baked swiss roll or roll cake before. I read that people often have issues on rolling the cake and it cracks. While thinking the best way to meet the challenge, I read the members' posts in the KBB maillist, many have problems already... It seems that this JRC or Japanese Roll Cake is more difficult than the ordinary roll cake. My confidence was sliding down the floor and melt like a marshmallow on a campfire. What can I do? When Junko post it in her blog (in japanese only), this kind of swiss roll (she named it Deco Roll) instantly hit the top. Oh no, don't look at my "towel" cake photo, that's the ugly failed one, far from kawaii or cute.. look at all the deco roll posted on her blog (at least you can look at the pictures, no?), then you will understand why people immediately fall in love to this kind of swiss roll. They are amazing! And me, after visiting Junko's blog, I think I caught the bug...

You might wonder.. towels? No, those are from my second attempts baking swiss roll

The challenge was sent with a recipe from Ibu Rachmah Setyawati, with detail instruction on how to draw design with cake batter. She posted her Sweet Green Polka Dots Japanese Roll Cake on her blog in October last year. Using recipe from Junko's book and modified it a little. That was the one sent to us for our challenge. In total I tried 3 times, the first and second attempts were disaster... you can see what I came up with from the "towel" picture above. Not only that they didn't raise well, they were wrinkle like the skin of that "towel dog" Chinese Shar Pei... This challenge really made me think hard how to solve those problems. The cake is supposed to be airy soft and smooth. I realised that I didn't fold the batter properly during mixing and I lost too much air from the batter. Let me explain how to make drawing design on this kind of swiss roll. Before pouring the main batter, we have to make design  or drawing using colored batter on a parchment paper that used to line the bottom of the baking tray. Freeze or quick-bake to set, cover with main batter and bake as usual. While doing the batter-drawing, I noticed that the moisture from the batter seeps into the parchment paper and makes it wrinkle. So, the solution I can think of are folding and mixing the batter carefully not to lose air, and using water resistant liner to line the baking tray or using silicone baking tray. Well, I don't have silicone baking tray, but I have this reusable silicone/parchment baking paper like this Kitchen Supply Parchment Paper (not paper actually), that can be cut to fit the tray. I wonder also if we can use wax paper or lightly oil the parchment paper? Maybe for the next experiment.

Taking care not to over-mix, the result from the third try was good. It seems that whisking egg white to the right consistency (soft peak) and mixing/folding the batter play a very very crucial role here. I enjoyed drawing the designs with different color.

Swiss Roll with Raspberry Honey Cream Filling

The cake recipe is based on sponge-cake recipe, using mostly white eggs. That's why it's a little bit "springy" when you bite on it, but I see that it minimize the risk of cracking when we roll and shape the cake. It's nicely soft, and with a good flavor for the creamy filling you'll have the best roll cake, in appearance, texture, and flavor. A complete package.

For the filling, on the second attempt (the "towel" swiss roll) I simply whip heavy cream and mix in the frozen mango puree (Gedong Gincu mango) I have in my freezer, no sugar added since the mango puree is already sweet enough from the mango. For the good third swiss roll, I use frozen raspberry and since the frozen raspberry is not sweet enough, I added honey to sweeten. Appears to be a good flavor combination.. raspberry and honey.

The recipe from KBB is good, but I see that the batter for drawing is way too much (well, at least for my design), so I reduced and separated just enough volume using Junko's technique.

Swiss Roll with Raspberry Honey Cream Filling

Sunday 25 March 2012

Fresh Mint Macarons for a 3 in 1 Birthday Celebration


Fresh Mint Macarons

One day at the weekend after the 21st of March is always chosen to celebrate 3 birthdays in our family. This year, it was yesterday. We gathered in my sister A's home, had a good Tumpeng Nasi Kuning (yellow rice in a cone shape)for lunch. For the dessert, I made Klappertaart (young coconut tart), Mint Macarons and Tamarind Pineapple Macarons. And the best was... we enjoyed all the good jokes and discussions we had there.

Tumpeng Nasi Kuning  Tumpeng Nasi Kuning

I am sorry that I can only share the picture of the Tumpeng Nasi Kuning and not the recipe. In fact, I've never made one. Several times I made yellow rice, but not shaped it into a cone or a tumpeng. Here in Indonesia we cook yellow rice using turmeric, and usually shape it into a tumpeng for a celebration on something as our way to thank the Lord for His blessings and for whatever good thing just happens in our lives. Such for birthday, newly born baby in a family, graduation, house warming party, etc. You see from the picture that it's not simply a cone-shaped yellow rice, but it's elaborated with so many condiments around it to eat Nasi Kuning with.

As its name, Klappertaart was introduced by the Dutch when they occupied our country. Made from eggs and young coconut (when the coconut flesh is still soft and gelatinous). However, I still need work on the recipe to make it better. I used a recipe from an Indonesian cookbook, but it's not as perfect as I want it to. So, I will only post the recipe whenever I am sure that it will make a perfect Klappertaart.

Tamarind Pineapple MacaronsTamarind Pineapple MacaronsTamarind Pineapple MacaronsFresh Mint Macarons and Tamarind Pineapple Macarons

Now the macarons. You have the recipe for my Tamarind Pineapple Macarons, which is my favorite after the Lemon one (you know I like everything sour). Unfortunately, I ran out of palm sugar and used all white sugar powder instead. What a big difference it makes. Flavorwise, the palm sugar one was way much better than the white sugar one. Now I can tell you to use palm sugar for the best result. Trust me.

Fresh Mint Macarons and Tamarind Pineapple Macarons

I decided to try baking Mint Macarons since I often see fresh mints being sold in a small vegetable and fruit store in my apartment. I like the taste and the smell of fresh mints, and imagined how if I make macarons out of it. So, there I was, baking Mint Macarons using fresh mints in its shells and its filling. However, I consider that the flavor is not strong enough, so maybe next time I will add some mint extract into the recipe. But if you like soft and mild flavor of mints... there you have the recipe.

Fresh Mint Macarons

Tuesday 6 March 2012

Tamarind Pineapple Macarons

Tamarind Pineapple Macarons

I always want to share with you something unique and it's always my pleasure to experiment with different flavors. The Indonesian culinary has many desserts I can choose to replicate and switch into cupcakes... so many specific ingredients with particularly tasty combinations: palm sugar, coconut and coconut milk, rice, sago, cinnamon, cloves, nutmeg, vanilla, lemongrass, ginger, tamarind, and a lot of tropical fruits. As you know I like tart and sour tastes, and I like tamarind a lot. So... this time macarons flavored with tamarind. Tamarind is one of the key ingredients for Rujak sauce. Rujak is a different fruits' cut with palm sugar-tamarind sauce as its dipping sauce. The sauce is tart because of the tamarind, sweet from the palm sugar, and some chillis to make it hot.

Tamarind Pineapple Macarons


Tamarind, palm sugar, and pineapple. Those are the main flavors in our macarons this time. The shells is flavored with palm sugar. However, I wasn't sure whether it's possible to add tamarind into the shells, so I just leave it out for this first try. In fact, I wasn't sure with the palm sugar either, but I thought I should give it a try. So for the first try, I substituted about a third of the powder sugar with palm sugar... and it worked like magic!! Then for the filling, it represents the Rujak dessert. So, with tamarind, palm sugar, and fruits chutney or puree. For the fruit, this time I used pineapple, but green sour apple (like Granny Smith apple) will create a good combination also. I incorporated the tamarind in the buttercream filling and pipe the pineapple puree inside the tamarind buttercream.

I was pretty happy with the result. It's sour as I want it to be and since palm sugar is less sweet than the beet/cane sugar, it's resulted in a less sweeter shells. Besides, the palm sugar gives a nice soft palm-sugar flavor to the shells. Perfect.

Tamarind Pineapple Macarons

Saturday 3 March 2012

Pumpkin Parmesan Scones

Pumpkin Parmesan Scones

Back again after four months. I spent two months holiday in France with my loving husband. We celebrated Christmas and New Year with some of our best friends there and been invited here and there for good lunch or dinner. I savored so many good foods, experiencing different new flavors I had never tasted before and every time I eat, my taste-buds were wildly flapping their wings of to the ceiling... Now I am back in Jakarta, and after one full month catching up with the work, and getting used to Jakarta's traffic jam again, I think this weekend is the perfect time for "blogging time".

Pumpkin Parmesan Scones

In November, before I left for my long holiday, I was stunned by Stacy's pictures of her Pumpkin Parmesan Scones in her Bakercourt blog. They are gorgeous and my mind went wild imagining how the taste would be. I have to bake one. Unfortunately, I was so busy with my work and traveling here and there (also for my work). And since I was going to leave for a long holiday at the end of that month, I tried to limit my grocery-shopping so I would not have many things sitting in my fridge.

Pumpkin Parmesan Scones

This morning I woke up and suddenly remembered that I still had half of orange kabocha pumpkin (japanese pumpkin) in the fridge. If it's still good then it would be perfect for Stacy's Pumpkin Parmesan Scones. In fact, it was still in perfect condition after sitting there for two weeks, as if it was just being cut in half one day before. A little part of it was frozen because I put it in the very back of the fridge (that's why I forgot it for long). But it didn't matter since it would be pureed anyway.

The original recipe doesn't explain how to make pumpkin puree, and I have no idea how the consistency should be. I assumed it should be like tomato puree. So I had to find my own technique for that. I decided to microwave the pumpkin, because I didn't want to add any liquid in it. Boiling or steaming would add moisture or water and make the puree more liquid. Baking it in the oven would give a kind of roasty slightly burnt flavor which I don't want.

While mixing the ingredients, instead of having 3/4 cup of pumpkin puree as in the original recipe, I accidentally pour one full cup in. Oops! my dough was too soft and sticky. But that was not a big problem. I just oiled my palms and shaped the dough (apparently this is easier and less messier than rolling and cutting the dough) in round discs of 7 cm diameter and 2 cm thick. I want big scones!

Pumpkin Parmesan Scones

I did several changes on the recipe, even though I think they are not that important and I also think they don't change the overall end result. I also didn't have self-raising flour as the original recipe calls for, so I simply used all-purpose flour and baking powder. One important thing in making scones is to avoid gluten formation. Gluten will make scones chewy and harder and we won't have a soft and crumbly scones. Use cold ingredients whenever possible. In this recipe, I recommend using cold milk and cold puree. And... working on the dough as little as possible. Knead or mix just enough to blend all the ingredients in. Not too long.

Pumpkin Parmesan Scones

There are several things I like from this pumpkin scones: the scones have a nice thin crust outside (maybe because of a little bit of oil from when I shaped the scones and from the egg-yolk) and quite moist soft and crumbly inside (I think that's because of the moisture from the pumpkin puree). The mix of parmesan cheese, freshly cracked black pepper and salt flakes appears to be a brilliant idea. It gives a nice salty cheesy-peppery flavor to balance the slightly sweet pumpkin flavor. Then a hint of nutmeg flavor complete the perfect blend of flavors for this scones. I like this Pumpkin Parmesan Scones a lot. So, thanks to Stacy for sharing the recipe.

Pumpkin Parmesan Scones